Even new vehicle fluids can be contaminated before you buy them, thanks to manufacturing flaws, storage mistakes, or handling errors. Dirt, debris, and impurities can sneak in during production or when fluids sit in imperfect storage conditions. Improper handling or contaminated packaging can also introduce contaminants. If you’re concerned about quality, understanding how fluids can get dirty and what signs to look for can help you avoid potential damage. Keep going to learn more about keeping your fluids pristine.
Key Takeaways
- Manufacturing processes can introduce dirt, metal particles, or impurities into fluids if hygiene standards are not strictly maintained.
- Contamination can occur during packaging, such as exposure to dirt, moisture, or unclean containers before sale.
- Improper storage and handling practices, like using contaminated tools or unsealed containers, can introduce microbes and debris.
- Fluids may appear contaminated through visual signs like cloudiness, discoloration, or floating particles even when brand new.
- Testing and inspecting fluids for unusual odors, color changes, or cloudiness helps confirm early contamination before use.

FOI LABORATORIES Premium Diesel Fuel Test Kit – Accurate Water & Contamination Testing | Easy-to-Use Fuel Quality Checker for Diesel Tanks, Generators, and Equipment
Accurate Detection in Seconds: Identify water contamination quickly, ensuring diesel quality and protecting your engine.
As an affiliate, we earn on qualifying purchases.
As an affiliate, we earn on qualifying purchases.
How Fluids Can Be Contaminated Before You Buy Them
Have you ever wondered how fluids can be contaminated even before you purchase them? During fluid manufacturing, contamination can occur if proper hygiene and quality controls aren’t followed. Manufacturing equipment might introduce dirt, metal particles, or other impurities into the fluid. Additionally, storage contamination plays a significant role; if containers aren’t sealed properly or are exposed to dust, moisture, or airborne pollutants, the fluid can become contaminated before it even reaches the store. Poor handling during packaging can also introduce microbes or debris. These early contamination points highlight how fluids aren’t always as clean as they seem when you buy them. Proper hygiene during manufacturing is crucial to prevent such issues. Moreover, quality control standards are essential to ensure the safety and purity of the fluids before they reach consumers. Ensuring adherence to industry regulations further minimizes risks of contamination at all stages of production and distribution. Implementing stringent testing procedures helps detect contamination before products are shipped out. Manufacturing protocols also play a vital role in maintaining fluid integrity throughout the process.

Orion Motor Tech Oil Extractor Pump and Dispenser Tool Kit, 10L Pneumatic Transmission Fluid Bleeder Set, 2.6gal 2 Way Vacuum Fluid Evacuator and Filler Oil Change Kit 15 ATF Refill Adapters 3 Hoses
10L Extractor & Dispenser: Orion Motor Tech's 2.6 gallon vacuum fluid bleeder set uses compressed air up to…
As an affiliate, we earn on qualifying purchases.
As an affiliate, we earn on qualifying purchases.
Signs Your New Fluid Might Be Contaminated

If your new fluid looks unusual or has a strange color, it could be contaminated. Persistent odors that don’t dissipate are also a red flag. Keep an eye out for these signs to prevent potential damage to your vehicle. Additionally, content formats are constantly evolving, which underscores the importance of recognizing signs of contamination early. Regularly inspecting fluid quality and understanding fluid replacement procedures can help you catch issues before they lead to costly repairs. Being aware of contamination detection methods can further empower you to maintain your vehicle’s health effectively. For example, understanding the science of fluid contamination can help you identify subtle changes that indicate issues before they become serious. Knowing about Youngster Choice can provide insights into how individual factors affect fluid quality and vehicle maintenance.
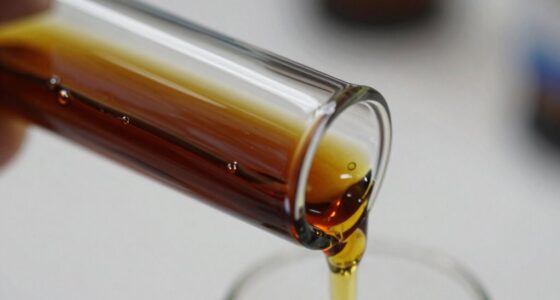
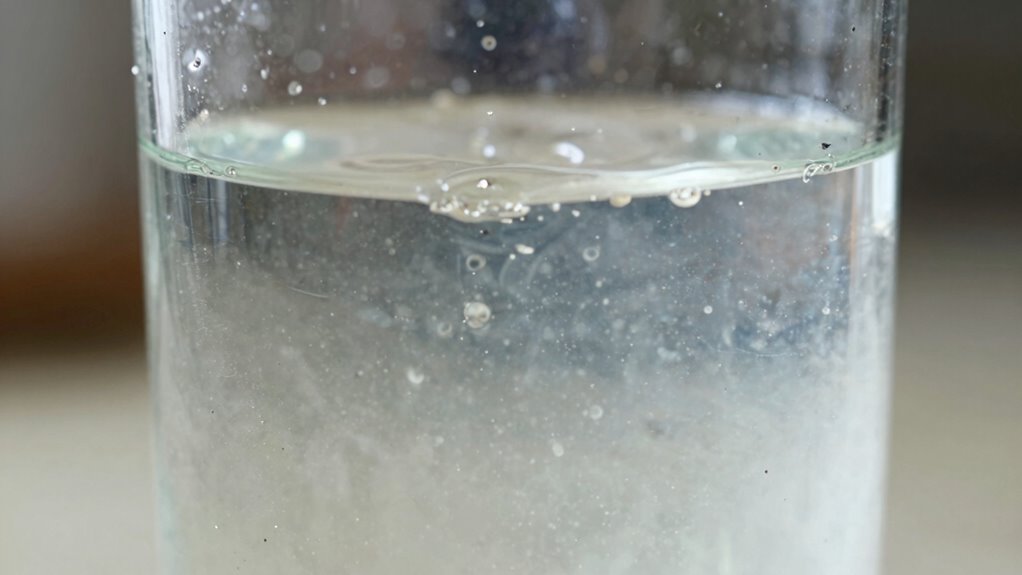
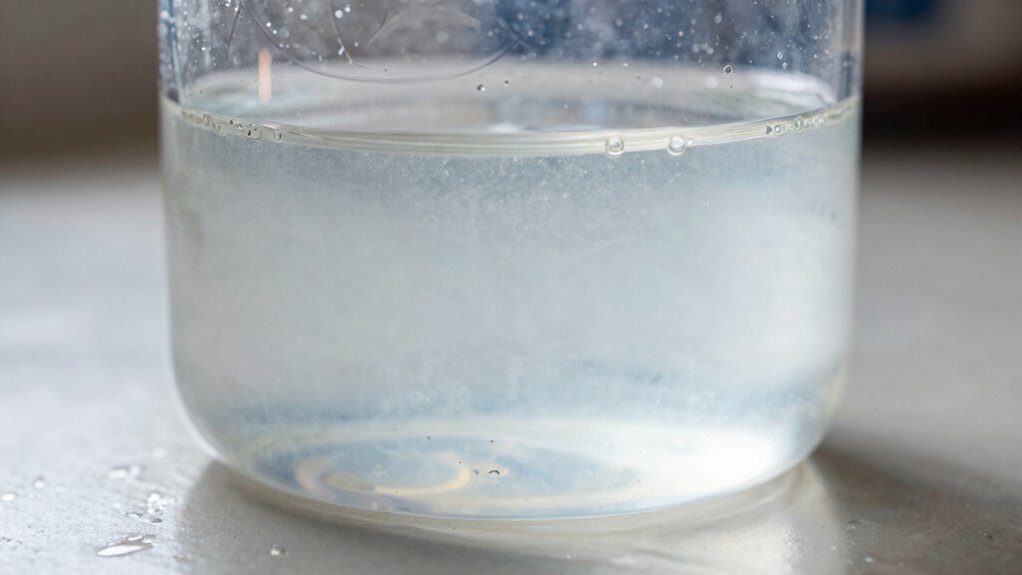
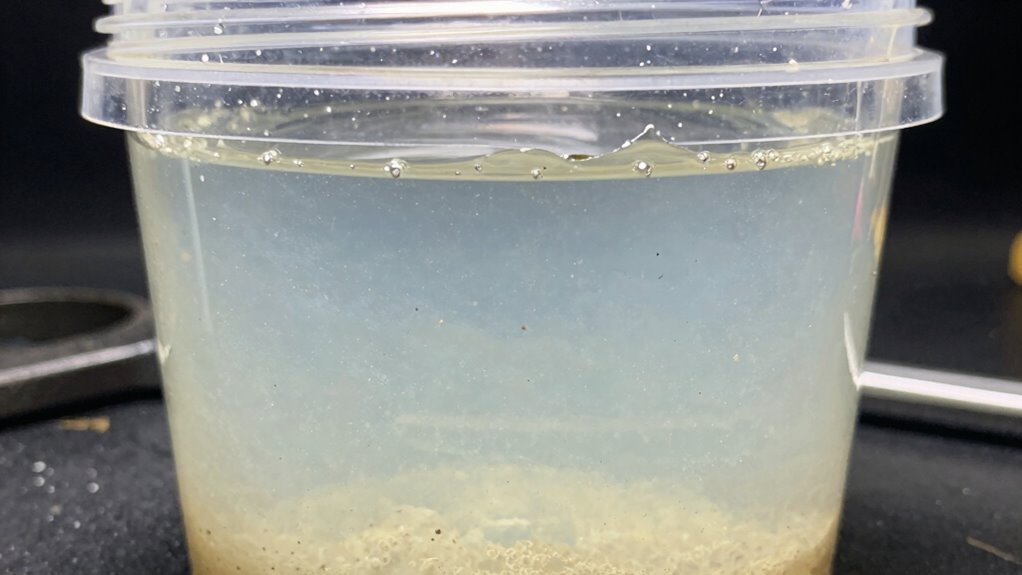
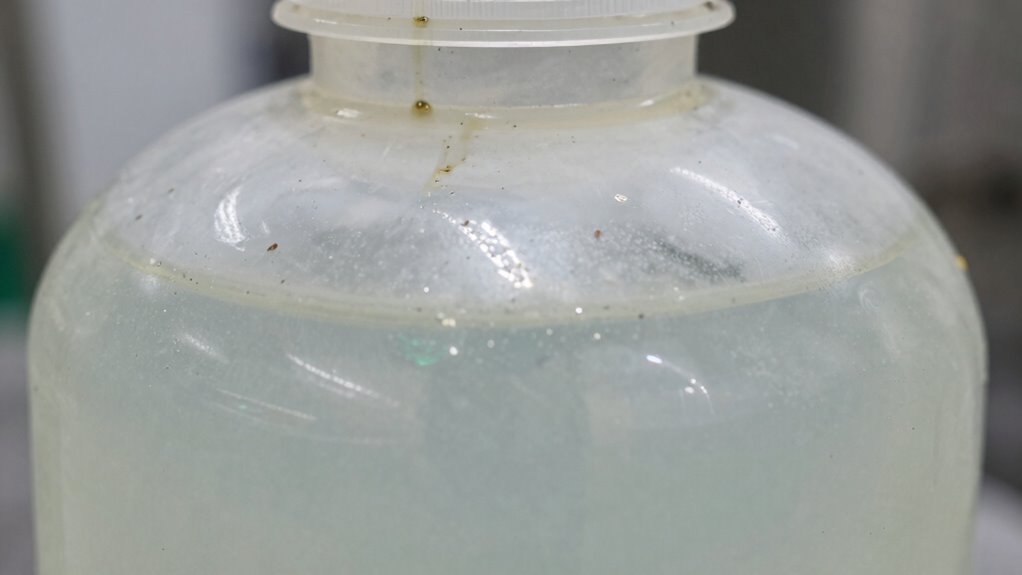
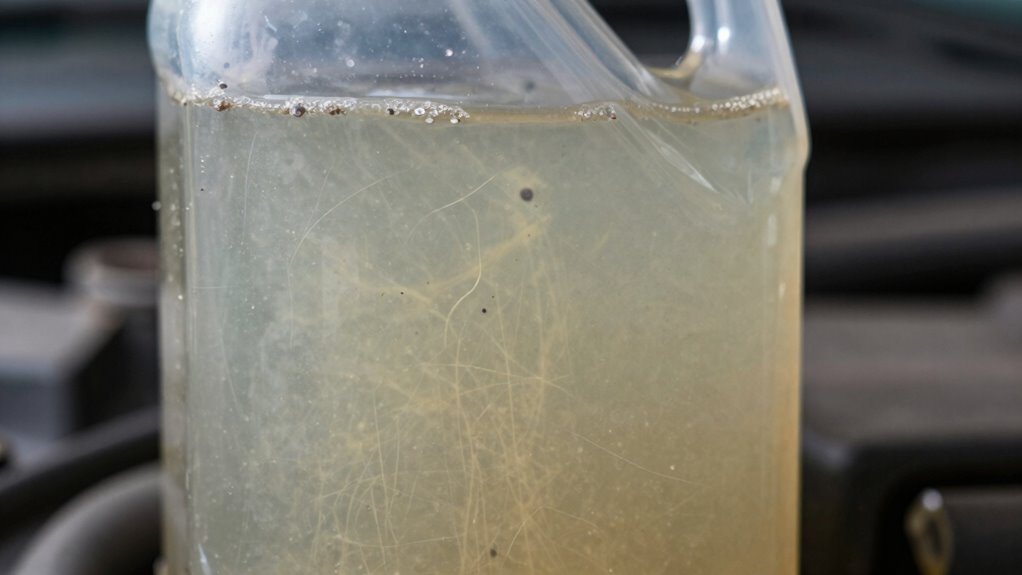
Unusual Fluid Color
When you notice your new fluid has an unusual color, it’s a clear sign that contamination may have occurred. Fluid color anomalies are key contamination indicators that shouldn’t be ignored. For example, transmission fluid that appears dark or cloudy, instead of its normal bright red or pink hue, can signal impurities or old fluid mixing in. Similarly, engine oil that’s milky or has a frothy appearance points to coolant intrusion. These color changes often indicate the presence of dirt, debris, or other contaminants that compromise fluid integrity. Recognizing these signs early helps prevent further damage to your vehicle’s components. Proper fluid maintenance is essential for maintaining the safety and performance of your vehicle. Being aware of contamination signs can help you address issues before they lead to costly repairs. Additionally, understanding regional fluid color variations can aid in accurate diagnosis and timely intervention. Recognizing contamination early allows for prompt testing and remediation, which can save you money and prevent breakdowns.
Persistent Odor Issues
Persistent odors emanating from your vehicle’s fluid can be a strong warning sign of contamination. Unusual smells often indicate issues with fluid chemistry, suggesting it’s been compromised. If you notice a burnt or sour odor after a recent fluid change, it could mean contaminants are affecting your engine maintenance. Contaminated fluids can cause internal damage, reduce lubrication, and impair performance. Regularly smelling strange odors should prompt you to check fluid quality and consider a professional inspection. Keep in mind that fresh fluids shouldn’t produce strong or foul smells. Addressing odor issues early helps prevent more serious problems down the line, ensuring your engine stays in good shape and your vehicle runs smoothly. Additionally, microplastic contamination can be present in dust and fluids, posing hidden risks to engine components and your health. comogenic ratings can guide you in choosing non-irritating, safe fluids that won’t clog or damage engine components. Being aware of fluid chemistry and how contaminants alter it can help you make informed decisions about maintenance. Regularly monitoring fluid conditions can also help detect early signs of chemical imbalance, which may indicate contamination or deterioration. Understanding fluid deterioration can further aid in identifying when fluids are no longer effective, preventing potential damage. Don’t ignore these signs—your vehicle’s health depends on proper fluid chemistry.

KAIWEETS Brake Fluid Tester Pen with Corrosion Resistance Probe, High-Precision Brake Fluid Moisture Tester with Data Hold Function, Buzzer Alarm, 3 Colors Backlight, Calibrated for DOT3, DOT4, DOT5.1
Durable and Corrosion-Resistant : Featuring a corrosion-resistant probe, this brake fluid tester is designed for long-lasting performance. The…
As an affiliate, we earn on qualifying purchases.
As an affiliate, we earn on qualifying purchases.
Common Storage and Handling Mistakes That Introduce Contaminants
Many common storage and handling mistakes can introduce contaminants into fluids, compromising their effectiveness and risking equipment damage. Storage hazards, such as exposing containers to moisture, dirt, or temperature fluctuations, create opportunities for contaminants to enter. Incorrect handling mistakes, like opening containers with dirty tools or not sealing them properly, further increase contamination risk. Using unclean storage tanks or transferring fluids with contaminated equipment can also compromise fluid quality. Always make certain containers are stored in clean, dry environments and sealed tightly when not in use. Avoid leaving containers open or exposed to dust and debris. Proper handling and storage practices are essential to maintain fluid purity and prevent contamination before use. Staying vigilant about these hazards helps protect your equipment’s performance and longevity. Additionally, using high-quality fluids can reduce the risk of contamination and improve overall system reliability. Regularly inspecting storage areas and maintaining cleanliness can further minimize the chances of introducing harmful contaminants into your fluids. Incorporating proper storage techniques ensures that fluids remain uncontaminated over time. Being aware of and controlling environmental factors like humidity and temperature fluctuations also plays a crucial role in preserving fluid integrity. Implementing monitoring protocols can help detect early signs of contamination, allowing for prompt corrective actions to prevent system failures.
KAIWEETS Brake Fluid Tester Pen with Corrosion Resistance Probe, High-Precision Brake Fluid Moisture Tester with Data Hold Function, Buzzer Alarm, 3 Colors Backlight, Calibrated for DOT3, DOT4, DOT5.1
Durable and Corrosion-Resistant : Featuring a corrosion-resistant probe, this brake fluid tester is designed for long-lasting performance. The…
As an affiliate, we earn on qualifying purchases.
As an affiliate, we earn on qualifying purchases.
How Manufacturing Can Contaminate Your New Fluid
Manufacturers can unintentionally introduce contaminants into your new fluid during the production process. Manufacturing defects, such as improper sealing or equipment wear, can leave debris or unwanted particles in the fluid. Even with strict quality assurance protocols, oversights happen. Here are four ways contamination can occur during manufacturing:
- Equipment contamination from dirty or worn machinery.
- Cross-contamination due to inadequate cleaning between production runs.
- Packaging errors that expose fluids to dirt or moisture.
- Material impurities from raw ingredients not properly filtered or processed.
- Processing contaminants may also be introduced through manufacturing processes, which require strict control to prevent unintended contamination. Additionally, the use of substandard raw materials can introduce unexpected impurities into the final product, compromising its quality.
Despite quality assurance efforts, these issues can slip through and compromise the purity of your new fluid. Always consider the possibility of manufacturing contamination when evaluating a fresh supply.
How Dirty Fluids Can Damage Your Car
Dirty fluids in your vehicle can cause immediate and long-term damage to key components, leading to costly repairs and reduced performance. When fluids degrade due to contamination sources like dirt, metal particles, or moisture, they lose their lubricating and cooling properties. This increases friction and wear on essential parts such as the engine, transmission, and brakes. Contaminants accelerate fluid breakdown, making them less effective at protecting your vehicle. Over time, this can cause overheating, corrosion, and mechanical failure. Dirty fluids also clog filters and passageways, impairing fluid flow and system efficiency. Regularly checking and replacing fluids helps prevent these issues, but if contaminated fluids are left unchecked, they can compromise your vehicle’s reliability and lifespan, ultimately costing you more in repairs.
How to Check if Your Fluid Is Clean and Safe to Use

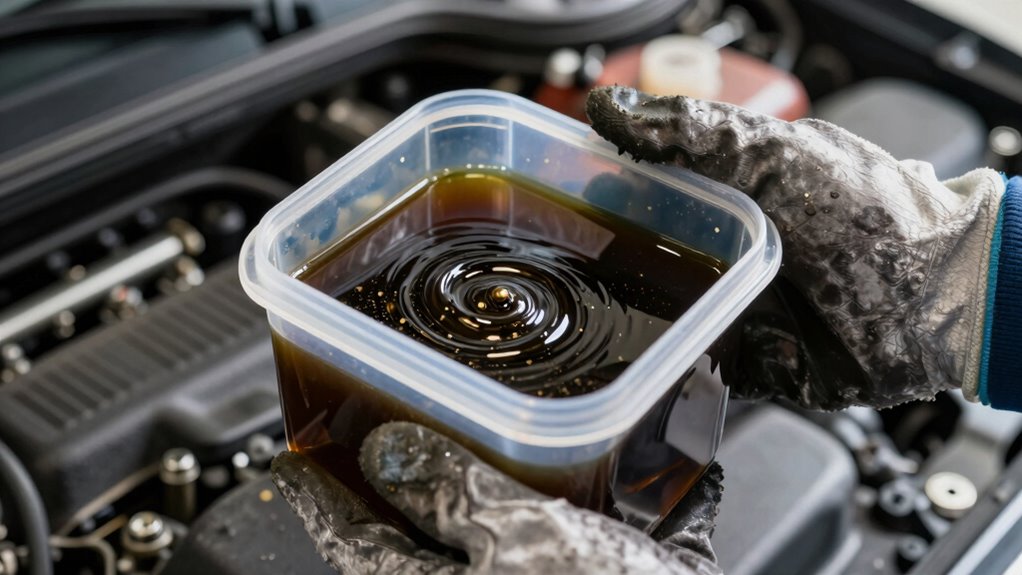
To guarantee your fluids are clean and safe, start with a visual inspection to spot any discoloration or particles. Check the fluid’s color, as dark or cloudy fluids often indicate contamination. You can also test for contaminants using simple methods to confirm the fluid’s quality before use.
Visual Inspection Techniques
Examining your fluids visually is a straightforward way to determine if they’re clean and safe to use. Start with a thorough container inspection, checking for any signs of dirt, debris, or discoloration that could indicate contamination. Look closely at the fluid’s clarity; murky or cloudy fluids suggest compromised fluid purity. Observe for floating particles or sediment at the bottom, which signal contamination. Also, examine the container for cracks or leaks that might allow contaminants in. These visual cues can reveal a lot about the fluid’s condition before you even test it further. Regular container inspection helps ensure your fluid remains clean and effective, preventing damage to your equipment caused by contaminated fluids. Quick visual checks can save you time and costly repairs later.
Checking Fluid Color
After inspecting the container for physical signs of contamination, checking the fluid’s color provides a quick and effective way to assess its cleanliness. Clear, bright fluid indicates good fluid purity, while dark or murky fluid suggests contamination. Pay attention to unusual colors or sediment, which can compromise contamination prevention efforts. Use the table below to interpret common fluid colors and their meanings:
| Color | Significance | Action Needed |
|---|---|---|
| Clear/Light | Good fluid purity, safe to use | No action needed |
| Dark/Cloudy | Possible contamination, needs testing | Replace or flush |
| Brown/Red | Oxidation or old fluid | Consider replacement |
| Opaque/Strained | Severe contamination or degradation | Replace immediately |
Always prioritize fluid color as part of your maintenance routine to ensure safe operation and avoid costly repairs.
Testing for Contaminants
Testing for contaminants is a crucial step in ensuring your fluid remains clean and safe to use. It helps verify chemical stability and identifies potential issues early. To do this effectively, you should:
- Conduct visual inspections for cloudiness, particles, or discoloration.
- Follow specific testing procedures, such as chemical analysis kits, to detect impurities or degradation.
- Use laboratory tests to measure pH levels and chemical stability, confirming the fluid’s condition.
- Check for oil or fluid contamination with test strips or spectrometers, ensuring no unwanted substances are present.
Tips for Properly Storing and Handling Fluids to Prevent Contamination
To prevent contamination, it is vital to store and handle fluids carefully. Always choose proper fluid packaging that keeps contents sealed and protected. Use clean, airtight storage containers designed for automotive fluids—never reuse containers meant for other substances. Keep containers upright and in a cool, dry place away from direct sunlight and extreme temperatures. Label each container clearly to avoid mix-ups. When pouring fluids, use funnels to prevent spills and dirt from entering the container. Avoid touching the inside of caps or openings to prevent introducing contaminants. Regularly inspect storage containers for cracks, leaks, or dirt, and replace them as needed. Proper storage and handling are essential to maintain fluid purity and prevent early contamination.
When and How to Replace Contaminated Fluids for Your Vehicle’s Best Performance
Regularly replacing contaminated fluids is essential for maintaining your vehicle’s ideal performance and preventing costly repairs. Knowing when and how to replace fluids ensures maximum fluid filtration and contamination prevention. First, follow your manufacturer’s recommended service intervals; these are tailored for your vehicle. Second, monitor fluid conditions—dark, gritty, or foul-smelling fluids indicate the need for immediate replacement. Third, consider fluid testing if you suspect contamination, as this guides accurate replacement timing. Lastly, always use high-quality replacement fluids and properly dispose of old fluids to prevent contamination. Proper fluid filtration during the replacement process helps remove debris and contaminants, extending fluid life. Staying proactive with fluid changes keeps your vehicle running smoothly and helps avoid damage caused by contaminated fluids.
Frequently Asked Questions
Can Contaminated Fluids Cause Immediate Engine Failure?
Yes, contaminated fluids can cause immediate engine failure. When oil degrades or picks up contamination sources like dirt, metal particles, or water, it loses its lubricating properties. This can lead to increased friction, overheating, and component damage. If you use fluids that are already contaminated, you risk severe engine issues right away, so always check for proper quality and cleanliness before installation.
Are There Specific Brands Less Prone to Contamination?
Choosing a brand with a solid reputation is like picking a trusted friend—you want reliability. Some brands with high manufacturing standards are less prone to contamination, ensuring your fluids stay clean longer. Look for well-known manufacturers committed to quality control, as these are less likely to supply contaminated products. While no brand is perfect, sticking to reputable ones gives you a better chance at avoiding issues caused by contaminated fluids.
How Long Can New Fluids Sit Before Contaminating?
You can usually store new fluids for about 6 to 12 months before contamination risks increase, but this depends on storage conditions. Keep the fluid in a sealed, airtight container and store it in a cool, dry place away from direct sunlight. If the storage duration exceeds a year, contamination risks grow, and using the fluid might compromise your vehicle’s performance. Always check for discoloration or particles before use.
Do Environmental Factors Affect Fluid Contamination During Storage?
Environmental exposure and storage conditions definitely impact fluid contamination. If you leave your fluids in areas with high humidity, dust, or fluctuating temperatures, contaminants can enter and grow over time. Proper storage means keeping fluids in sealed, cool, and dry environments, away from direct sunlight or moisture. By controlling these environmental factors, you reduce the risk of contamination and ensure your fluids stay clean and effective longer.
Is Professional Testing Necessary to Confirm Fluid Purity?
In this digital age, you can’t afford to skip professional testing to confirm fluid purity. Fluid testing ensures contamination detection, revealing issues like dirt, moisture, or metal particles that often go unnoticed. Relying solely on visual inspection isn’t enough—trusting experts guarantees accurate results. By having your fluid evaluated, you prevent potential damage and costly repairs, securing your vehicle’s longevity and performance. Don’t gamble—get professional testing today.
Conclusion
Protect your pockets and vehicle by prioritizing pristine fluids. Proper storage, vigilant inspection, and swift substitution shield your car from costly contaminants. Don’t let dirty, defective fluids damage your drive or drain your wallet. Stay savvy, stay safe, and steer clear of contamination crises with consistent care and cautious handling. Remember, maintaining clean fluids isn’t just a chore—it’s a vital key to car’s long-lasting, peak performance.