TL;DR
Moving your rig away from your workspace is the most effective noise solution. Proper placement, ventilation, and treatment inside a closet can make a tiny space surprisingly quiet without costly soundproofing. Learn about EV tech and home setups.
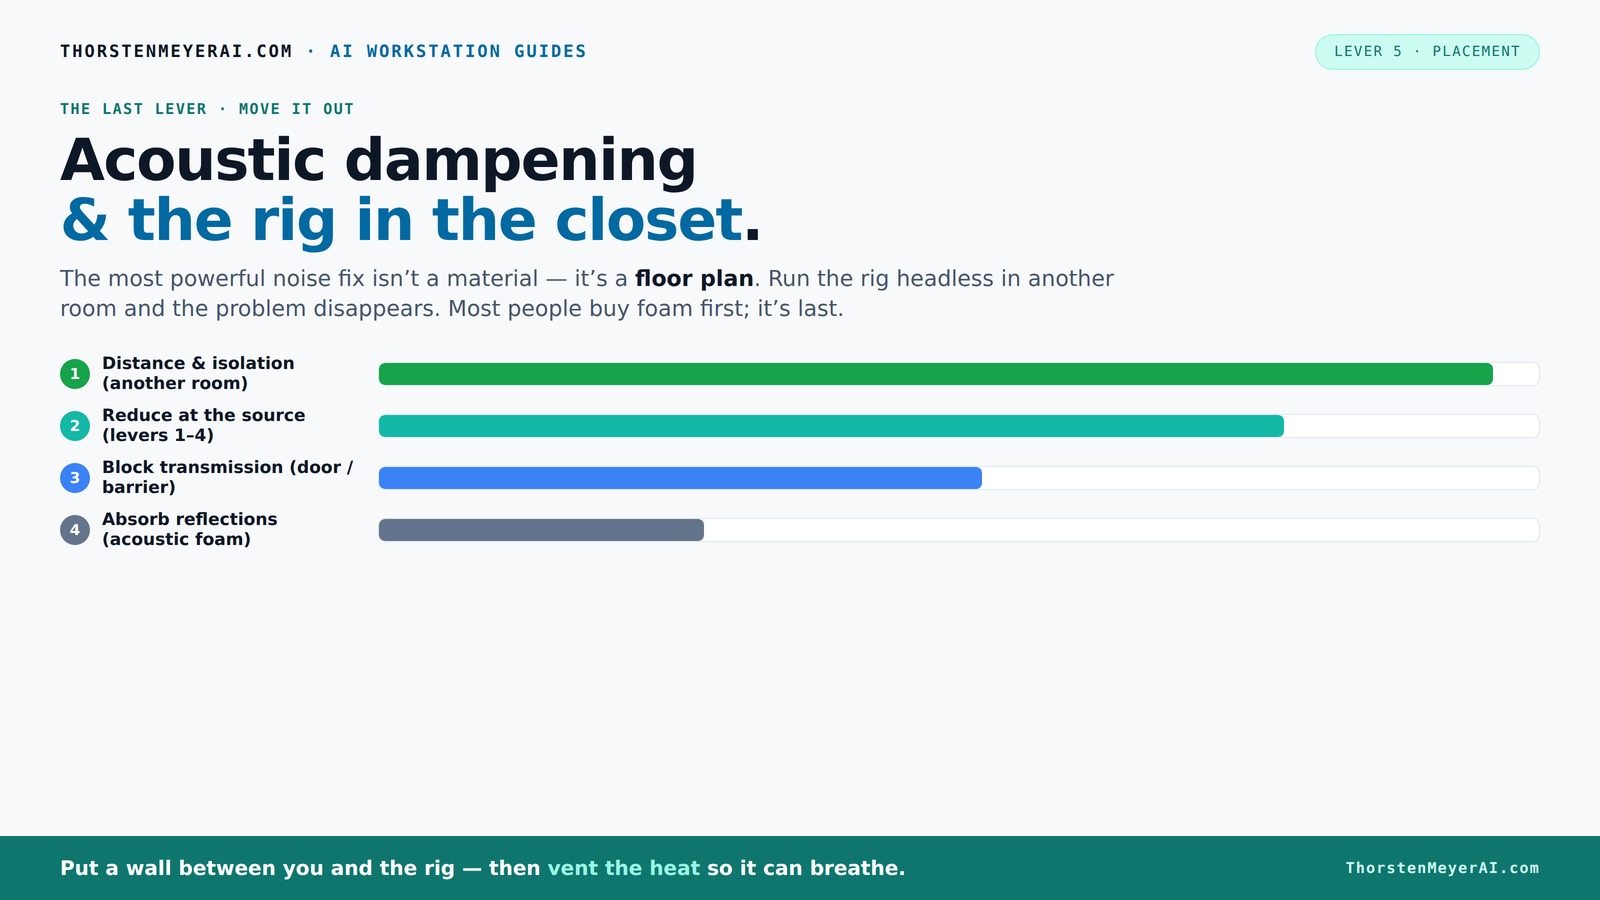
Acoustic dampening
& the rig in the closet.
The most powerful noise fix isn’t a material — it’s a floor plan. A rig you can’t hear because it’s in another room beats any amount of foam. Tap the approaches in Part 1 to see what actually works.
(another room)
(levers 1–4)
(door / barrier)
(acoustic foam)
Contain the noise, not the heat
Key Takeaways
- Moving your rig into another room or closet is the most effective way to silence it, especially for AI rigs where remote operation is possible.
- Proper ventilation and heat management are essential in closet setups—without airflow, your rig overheats and fans roar louder than ever.
- Treat all reflective surfaces—walls, ceiling, door, and floor—with foam, blankets, or rugs for the best echo reduction.
- Layering: combine wall absorption, door sealing, and vibration control for a quiet, healthy workspace.
- Thicker, broadband absorbers (2-4 inches) are more effective at managing low frequencies than thin foam alone.

Focusound 52 Pack Acoustic Foam Panels 1" x 12" x 12" Sound Proof Foam Panles Soundproofing Noise Cancelling Wedge Panels for Home Office Recoding Studio with 300PCS Double-Side Adhesive
Soundproofing - Acoustic foam panels triangular grooves structure for better noise absorption, helps to reduce and absorb unwanted...
As an affiliate, we earn on qualifying purchases.
As an affiliate, we earn on qualifying purchases.
Why Moving Your Rig Is the Best Fix for Noise
The simplest way to mute a loud rig? Put it somewhere else. Distance is the most powerful sound barrier. When your rig is in another room or a closet, the noise barely reaches you. Think of it like a giant sound shield—nothing beats physically separating the source from your ears.
In practical terms, most AI work is done over a network. You SSH into a remote rig, or connect via API. The machine's physical location becomes irrelevant. Your desktop stays silent, while the noisy beast roars in a closet or basement. This setup saves you money, effort, and headaches. Explore more about garage setups and DIY solutions.
Example: I set up a powerful GPU in a spare bedroom closet. I use a wired connection, and as long as it’s ventilated, I hear nothing. The rig does its job while I work in peace. It’s a game-changer for noise-sensitive environments.
quiet computer or AI rig enclosure
As an affiliate, we earn on qualifying purchases.
As an affiliate, we earn on qualifying purchases.
The 'Rig in the Closet' Setup — How to Do It Right
Placing a hot, high-load machine in a closet sounds perfect—quiet, out of sight. But heat buildup is the main enemy. Without proper airflow, your rig overheats and fans go into overdrive, defeating the purpose.
To do it right:
- Install passive vents or exhaust fans to let hot air escape.
- Use a soundproof cabinet or enclosure with ducted airflow for maximum quiet and cooling.
- Monitor the temperature regularly to avoid thermal throttling.
Recent designs blend foam lining with active ventilation, creating a sweet spot of quiet and heat dissipation. For example, a rig enclosure with proper acoustic treatment can keep temps in check while silencing noise effectively.
MorningRo 4 Pcs 3 Wire Shelf Corner Support Brackets Ventilated Wire Shelving Accessories, Support Brackets for Closet Shelving
Package Included: invest in our wire shelf corner support bracket package to ensure you're sufficiently equipped for your...
As an affiliate, we earn on qualifying purchases.
As an affiliate, we earn on qualifying purchases.
How to Use Acoustic Dampening Inside Your Closet
Acoustic dampening and soundproofing aren’t the same. Dampening reduces echo and reflections inside the space, making recordings clearer. Soundproofing stops sound from leaking out or in.
In a tiny closet, your goal is to block reflections and limit sound escape. Here’s how:
- Cover walls with thick foam panels—aim for 20–30% coverage for general echo control.
- Hang blankets or acoustic quilts on the door and walls—especially the side facing your mic.
- Place rugs or carpets on the floor to absorb bouncing sound.
- Use reflection filters around the mic to minimize bounce from nearby surfaces.
Effective dampening isn’t just about sticking foam on the walls; it’s about understanding how sound behaves in small spaces. Thick, dense materials absorb more mid and high frequencies, preventing them from bouncing and creating echo. Layering different materials—foam, blankets, rugs—targets various frequencies and reduces internal reflections. This layered approach results in clearer recordings, less reverb, and a more controlled sound environment, crucial for professional-quality audio in small rooms.

18 Pack Self-Adhesive Acoustic Panels Soundproof Wall Panels 12"X10"X 0.4" Sound Absorbing Panel for Decoration Sound Deadening Panels Acoustic Treatment Panel for Home Office(White Hexagonal Design)
🎸【Easy to and Install】High density sound proof foam panels not only enhance the acoustics of the room, but...
As an affiliate, we earn on qualifying purchases.
As an affiliate, we earn on qualifying purchases.
Placement Tips for a Tiny Closet Rig That Really Reduce Echo
Placement is everything in a tiny space. The key is to treat surfaces that reflect sound back into your mic. Usually, these are the walls near your mic, the ceiling, and the floor.
Here's a step-by-step:
- Position your mic away from the door and reflective surfaces.
- Place absorption panels directly behind and beside the mic—these are your primary reflection points.
- Cover the ceiling with foam or blankets, especially if it’s a hard surface.
- Use a rug or foam on the floor to prevent bouncing up into the mic.
Proper placement minimizes the chance of sound bouncing around the space and reaching your mic from unintended directions. By strategically positioning absorption materials at these reflection points, you’re effectively breaking the sound's path, which reduces flutter echo, reverb, and overall room coloration. This targeted approach results in recordings that sound more natural and professional, even in a tiny, acoustically challenging environment.
How Much Coverage Is Enough? The Secret to Quiet in Small Spaces
Coverage is about how much surface area you treat to tame reflections. For tiny closets, aim for at least 20–30% of the walls covered. More is better—especially the ceiling and the wall behind the mic. See detailed coverage tips.
In practice, many DIYers cover nearly all surfaces in a tiny closet. This broad approach reduces internal echoes and prevents low-frequency standing waves, which are common in small, parallel rooms.
Understanding the implications: More coverage means fewer sound reflections bouncing around, leading to a cleaner, more controlled sound. However, overdoing it can sometimes deaden the room excessively, making recordings sound unnatural or overly dry. The goal is to find a balance—enough treatment to reduce problematic echoes and standing waves without making the space sound overly dead. For most small closets, covering key reflection points and the ceiling provides a significant improvement in clarity and warmth, enabling professional-quality recordings in a tiny footprint.
Dealing with Bass and Low Frequencies in a Tiny Closet
Low-frequency buildup, or standing waves, is common in small, parallel spaces. These create a boomy, muddy sound that’s hard to fix with foam alone.
To combat this:
- Place bass traps in corners where low-end tends to accumulate.
- Use broadband absorbers that target low frequencies—thicker panels are more effective.
- Consider placing the mic slightly off-center or at an angle to reduce standing wave reinforcement.
Addressing low frequencies is crucial because they can dominate recordings, making voices sound muffled or boomy. Bass traps in corners are particularly effective because low frequencies tend to accumulate there, creating standing waves. Broadband absorbers that are at least 4 inches thick are more efficient at absorbing deep bass. Additionally, positioning the mic away from reflective surfaces or corners can reduce the reinforcement of these frequencies, leading to a clearer, more balanced sound. Ignoring low-frequency issues often results in recordings that sound muddy or unprofessional, especially in small, reflective spaces. A combination of strategic placement and targeted bass trapping balances the room’s acoustics, producing cleaner and more accurate audio captures.
Sealing and Blocking the Closet Door for Better Sound Control
The closet door is often a weak link in soundproofing. To block sound leakage:
- Hang thick blankets or acoustic quilts over the door.
- Seal gaps with weatherstripping or acoustic sealant.
- If possible, replace the door with a solid-core door or add a DIY barrier like a mass-loaded vinyl sheet.
Sealing the door isn't just about blocking sound—it prevents sound waves from leaking out, which can compromise the effectiveness of your entire setup. Gaps around the door frame are often the main culprits, especially if the door is hollow or thin. Using weatherstripping or acoustic sealant fills these gaps, providing a tight seal. Hanging thick blankets or quilts adds mass and damping, further reducing sound escape. Upgrading to a solid-core door or adding a mass-loaded vinyl barrier increases the door's mass, making it harder for sound to pass through. These methods create a more airtight barrier, which is essential if you want to contain noise within your closet. Proper sealing ensures your efforts in treatment and placement aren’t undermined by simple leaks, leading to a more effective noise reduction overall.
DIY Materials for Closet Acoustic Treatment That Won't Break the Bank
Effective closet treatment doesn’t have to be expensive. Common DIY solutions include:
- Moving blankets or acoustic quilts — thick and portable, easy to hang.
- Rugs or carpets — absorb bounce on the floor.
- Foam panels—2-inch thick panels are a good starting point.
- Reflection filters — inexpensive, wrap around the mic for added bounce reduction.
Understanding the tradeoffs: While DIY solutions are budget-friendly, they often involve a balance between effectiveness and convenience. Moving blankets and quilts are highly versatile and can be moved or adjusted easily, but they may not absorb as much as professional-grade foam, especially at lower frequencies. Foam panels are more targeted but can be costly if covering large areas. Reflection filters are inexpensive and simple but mainly reduce bounce around the mic rather than the room acoustics. Combining these DIY materials—using blankets for broad coverage, foam for critical reflection points, and rugs for floor bounce—creates an effective, customizable treatment system. The key is understanding your space’s specific acoustic challenges and layering affordable solutions to achieve a sound quality comparable to more expensive setups.
Vibration and Mechanical Noise: How to Prevent Them in a Closet Setup
Vibration can transmit through the structure, causing noise even if soundproofing is good. Use rubber isolation pads or grommets under your equipment to dampen vibrations.
Example: Placing a rubber mat under a server rack eliminated the low-frequency hum that traveled through the floor and walls, making the setup much quieter.
Vibration control is often overlooked but crucial, especially if your closet shares walls with other noisy spaces. Vibrations can cause structural noise that amplifies through the building, undermining your soundproofing efforts. Using rubber isolation pads, grommets, or mats under your equipment absorbs and dampens these vibrations, preventing them from traveling through the structure. Proper placement of these dampers—especially under heavy or vibrating gear—can significantly reduce low-frequency noise and mechanical hums. Ignoring vibration control often results in persistent noise issues that can’t be solved by acoustic treatment alone. Addressing these mechanical sources enhances overall silence, making your closet setup truly effective and less intrusive to others nearby.
How Thick Should Your Acoustic Materials Be?
Thicker panels absorb lower frequencies better. In small closets, 2-inch broadband panels are usually enough to tame mid and high frequencies. For deep bass or low-frequency issues, 4-inch panels or bass traps are preferable.
Example: A streamer upgraded from 1-inch foam to 2-inch panels and saw a noticeable reduction in echo and muddiness. Thicker treatment makes a real difference in small, reflective spaces.
Frequently Asked Questions
What’s the difference between acoustic dampening and soundproofing?
Acoustic dampening reduces echo and reflections inside a space, making recordings clearer. Soundproofing stops sound from leaking in or out. In a closet setup, focus on dampening to control internal reflections, and use barriers for containment.Where should I place foam or blankets in a closet recording booth?
Place foam panels directly behind and beside your mic—these are your main reflection points. Cover the ceiling and the door with blankets or foam to minimize bounce and sound leaks.Do I need to treat the corners, or the walls behind the mic?
Both matter. Corners can trap low frequencies—adding bass traps helps. Treating the walls behind the mic and nearby surfaces reduces flutter echo and improves clarity.How much coverage is enough for a small closet?
Aim for at least 20–30% wall coverage, including ceiling and door. Covering more surface area results in cleaner sound and less echo.Are acoustic blankets better than foam for a closet rig?
Blankets are versatile, affordable, and easy to hang, making them ideal for quick DIY setups. Foam panels are more precise but may be more costly. Combining both often yields the best results.Conclusion
The key to a quiet closet rig isn’t just foam or soundproofing—it’s smart placement, ventilation, and layered treatment. Think of your space as a system: move it away, treat the surfaces, and give it airflow. That’s how you tame noise without sacrificing your workflow or your equipment’s health.Imagine a tiny closet, humming away, while you work distraction-free. That’s the power of thoughtful setup. Your workspace should hum with productivity, not noise.